
Scroll without wheel: a QMK trick
Having few keys on a keyboard feels nice. Having even fewer keys feels better.
But, what about reducing the number of buttons on a mouse? Say, zero?
There is a neat QMK trick allowing for the use of the Ploopy nano. Let’s see how to handle moving, scrolling, and clicking without a single button thanks to it.
The trackball
First thing first: what is a Ploopy nano?
It’s not a mouse but a trackball. So, a simple ball is put on top of an optical sensor. If the ball rolls, the mouse moves. Simple right?
The thing with this particular trackball is that it has no button. At all.
Many mice out there have multiple additional buttons. Some have a couple, some dozen. But always more than the usual two.
The nano has none. It means it can point but it can’t click.
Clicketyclac
Before diving into the trick, the real meat of this post, let’s see how to click.
Simply use the keyboard. Not any keyboard of course. A QMK powered one making use of the mouse buttons.
As stated in this previous post, I only use 32 keys.
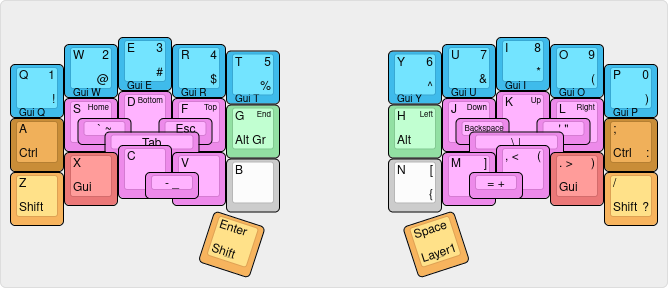
Yet, my keyboard has 36 physical keys. I’ve 4 unused keys to click, 2 on each side. I’m right-handed and therefore use the trackball with my right hand. Let’s put the clicks on the left pad.
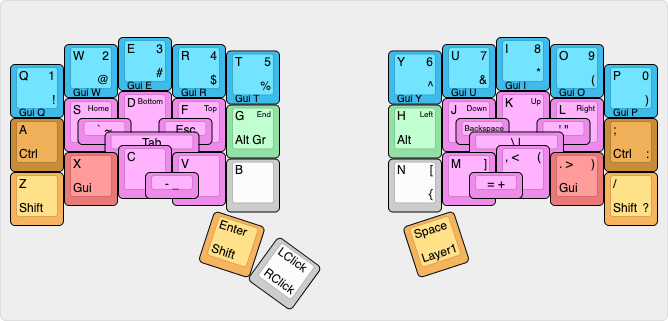
If I tap this button, I get a left click. If I hot it, I get a right click. I thought about adding a middle click button as well. But Ctrl + left click act as middle click on any decent operating system.
Scroll, scroll, scroooolll!
All right, I can point, I can click. I reached the 90’s, yeah 🎉
Good to know
There is one thing to know to understand what comes next. See those little lights on your keyboard? Yes, those, Num Lock, Caps Lock, and possibly others? Well, if you plug more than one keyboard into your computer, they’ll all have the same lights turned on or off. Switching Caps lock on one keyboard will also have it enabled on the others. And plugging in a new keyboard if Num lock is already activated will have the newly seen keyboard behave accordingly.
The thing is, the Ploopy nano runs QMK. Meaning, it’s technically seen as a keyboard by your computer. But a programmable keyboard!
A bit of code
Disclaimer: I mixed some pieces of code I found on various repositories. The original idea is not mine and I picked what was needed to make it work.
1 #include QMK_KEYBOARD_H
2
3 #define DELTA_X_THRESHOLD 60
4 #define DELTA_Y_THRESHOLD 15
5
6 const uint16_t PROGMEM keymaps[][MATRIX_ROWS][MATRIX_COLS] = {{{ KC_NO }}};
7
8 static bool num_lock_state = false;
9
10 static int8_t delta_x = 0;
11 static int8_t delta_y = 0;
12
13 void keyboard_post_init_user(void) {
14 num_lock_state = host_keyboard_led_state().num_lock;
15 }
16
17 report_mouse_t pointing_device_task_user(report_mouse_t mouse_report) {
18 if (num_lock_state) {
19 delta_x += mouse_report.x;
20 delta_y += mouse_report.y;
21
22 if (delta_x > DELTA_X_THRESHOLD) {
23 mouse_report.h = 1;
24 delta_x = 0;
25 } else if (delta_x < -DELTA_X_THRESHOLD) {
26 mouse_report.h = -1;
27 delta_x = 0;
28 }
29
30 if (delta_y > DELTA_Y_THRESHOLD) {
31 mouse_report.v = -1;
32 delta_y = 0;
33 } else if (delta_y < -DELTA_Y_THRESHOLD) {
34 mouse_report.v = 1;
35 delta_y = 0;
36 }
37 mouse_report.x = 0;
38 mouse_report.y = 0;
39 }
40 return mouse_report;
41 }
42
43 bool led_update_user(led_t led_state) {
44 num_lock_state = led_state.num_lock;
45 return true;
46 }
The sixth line is enough for the Ploopy nano to act as a pointing device. The magic happens elsewhere.
The keyboard_post_init_user function ensures the Num lock state of the computer is seen by the trackball on connexion. The led_update_user function toggle the num_lock_state boolean whenever the Num lock button is pressed on a keyboard. Remember, this is transmitted to every keyboard and the Ploopy nano is seen as one.
Now, to the pointing_device_task_user function. If num_lock_state is set to true, it looks at the last detected move. If it is a lateral one, it scrolls horizontally else vertically. And if num_lock_state is set to false, it behaves as a regular mouse, moving the pointer.
Final layout
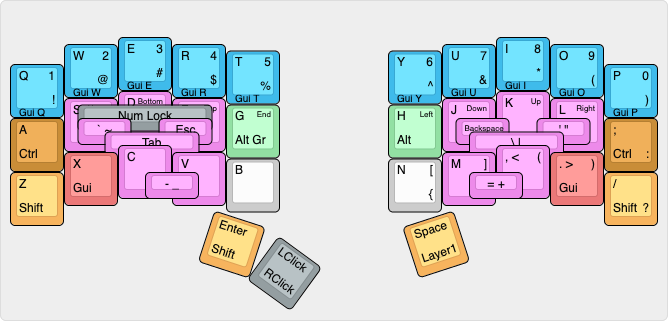
All that is left is to have the Num lock button added to the keyboard.
Again, the left half is privileged because the right hand is on the trackball. I could have picked the last key of the thumb cluster but it would have required moving the said thumb. And I don’t like to move fingers. I chose to add a combo on the home row.
Conclusion
I think it was already clear from my two previous posts: QMK is awesome! The various pre-made Ploopy nano codes I’ve seen did not work for me and my code is shorter than any of them 🤷 so I’m happy with how things turned.
I don’t recommend using such a setup unless you’re really into moving as little as possible. Contrary to reducing the number of keys, I feel like this one is a major change. It requires fighting muscle memory.
On the other hand, my trackball now sits between the two keyboard halves and I’m really happy with how minimal yet efficient it is. I move less and when I do it’s a more natural movement. All of this uses a total of 33 keys.